

Tag Input in Elixir Phoenix
Elixir Phoenix has been a favourite toy of mine since October 2021. Initially, I progressed slowly as I had to get used to the functional programming paradigm. Over time, the more I tried new things the more I understood, the more I loved it.
I started with simple things, building a mental bridge between the patterns I've known for years in the Object Oriented Programming world of PHP frameworks (Yii2 being my fave). When I grew more comfortable with the basics, I graduated to what made Elixir Phoenix really exciting: LiveView and LiveComponents.
My first real challenge landed when I decided to add a tag input widget to my backend. All my articles are created using a form based input: a LiveView so it made sense to add one extra type of form input.
Tags have a many to many relationship with articles. This means that one article may have many tags and any one particular tag can be applied to many different articles.

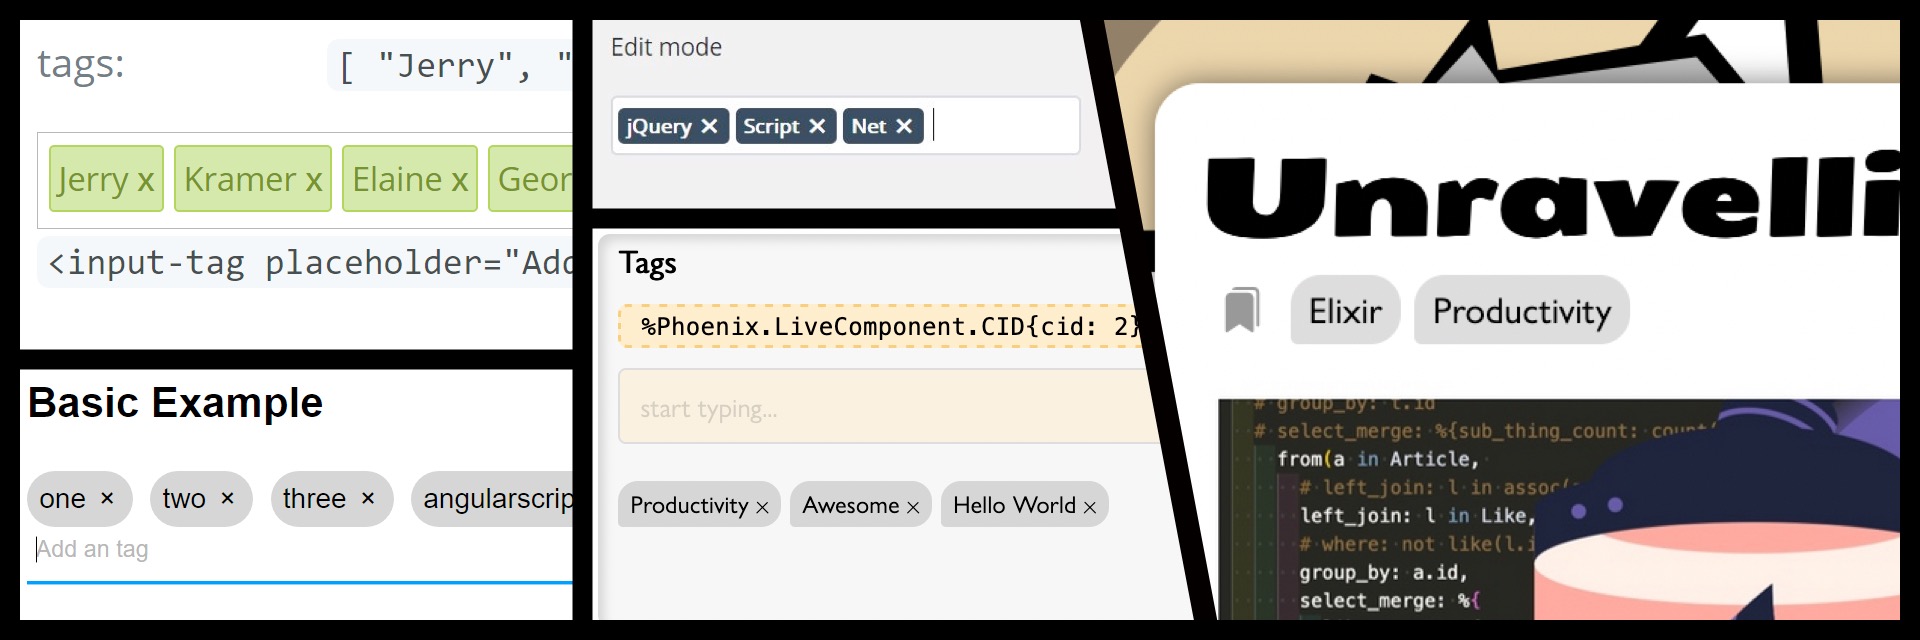
A tag input widget is basically a text input. Once a sentence is validated the text is rendered separately in an HTML component (span or a div). Internally the form element is saved as CSV or JSON format in a hidden input. Traditionally, the heavy lifting is done in JS on client side.
The idea here is to leverage on the web-socket connection provided by the LiveView to use events to update the tag list. On submit, the list is saved in a Database.
Component Tree
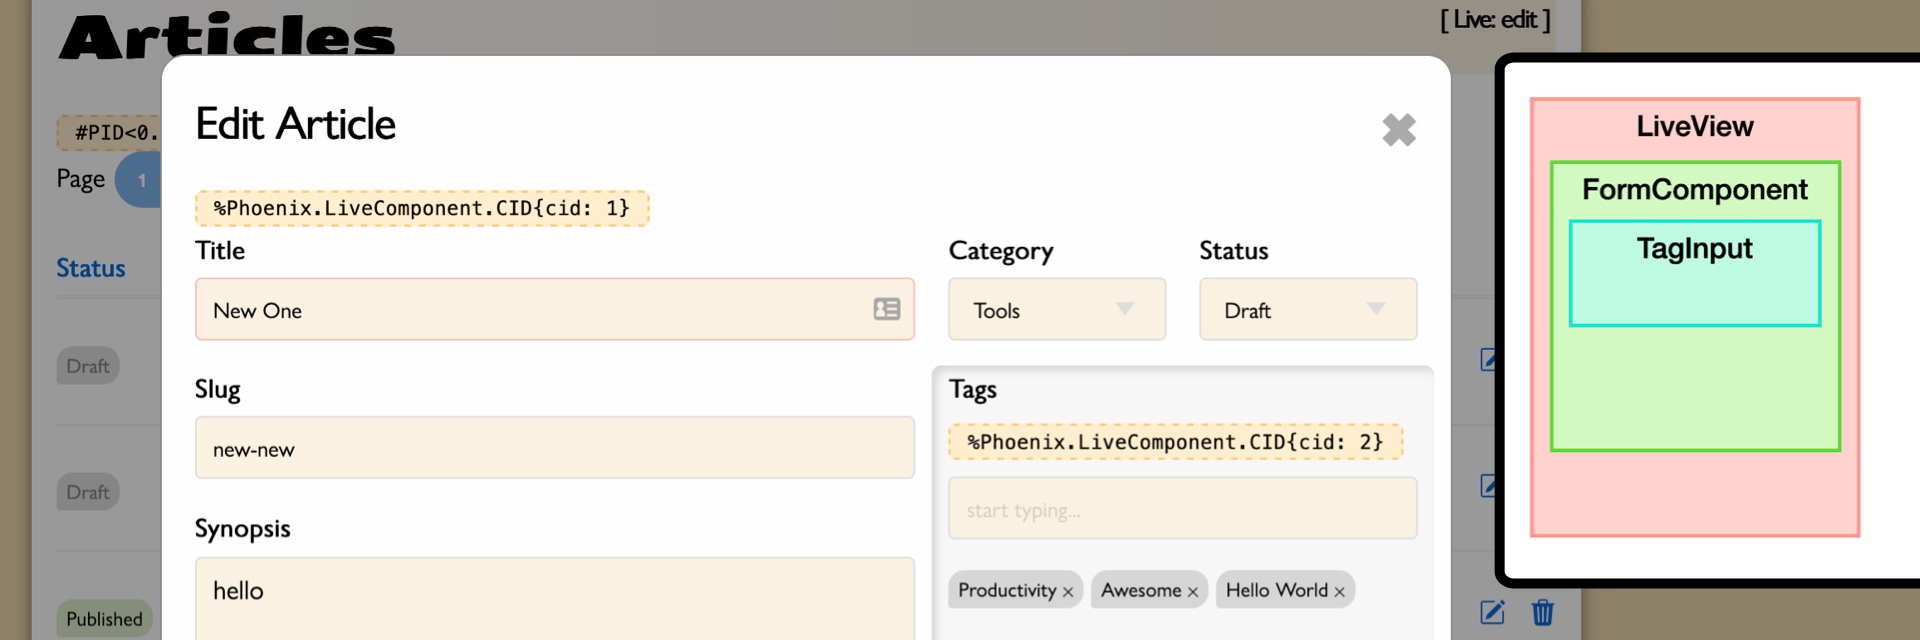
I encountered one main difficulty. It came from the many live layers created by Phoenix's LiveView generator. As such, I had to handle a component (my TagInput) nested within another component: the modal FormComponent.
Starting with the Form Component
We will add our component within the form defined with the FormComponent.
<.form let={f} for={@changeset} id="article-form"
    phx-target={@myself} phx-change="validate" phx-submit="save">
		...
    <.live_component module={MyApp.Helpers.TagInput}, f={f},
      changeset={@changeset},
      attribute={:tag_json},
      id={"taginput-#{@article.id || "new"}"} />
</.form>
All we need to transmit to our TagInput component is the current Changeset, the id required by Phoenix for LiveComponents and an attribute used to save the tag list (CSV, or JSON).
A Closer Look at the Changeset
Here is the Article schema
defmodule MyApp.Blog.Article do
  use Ecto.Schema
  import Ecto.Changeset

  schema "articles" do
    field :content, :string
    field :title, :string
    # here we define the many-to-many relationship
    many_to_many :tags, MyApp.Tag,
      join_through: "article_tag_items", # the association table
      on_replace: :delete # what to do when a connection is cut
    # this virtual field won't be persisted in DB
    field :tag_json, :any, virtual: true
	end
Do note that :tags represent a list of MyApp.Blog.Tag while :tag_json defines a virtual field. This field will not be persisted to the database and will not be type-checked because we declared its type :any. It will contain the JSON encoded list of tags generated by the TagInput widget.
When we submit the form defined in the form component, Phoenix sends parameters looking like this:
%{
  "content" => "<p>hello world</p>",
  "tags_json" => "[\"Awesome\",\"Hello World\",\"Elixir\"]",
  "title" => "New Test Article"
}
We will retrieve these parameters and pass them to the Ecto changeset defined for Article.
def changeset(article, attrs) do
  article
    |> cast(attrs, [:title, :content, :tag_json])
    |> validate_required([:title, :body])
    |> maybe_assoc_tags(attrs)
end
Now that we have tag_json defined within the changeset we need to translate it to something Ecto can work with.
defp maybe_assoc_tags(changeset, %{"tag_json" => json}) do
	changeset |> put_assoc(:tags, parse_tags(json))
end
In put_assoc/4, we give Ecto structures or changesets instead of parameters, allowing us to manipulate the data any way we want. Let's provide a list of MyApp.Tag schemas to put_assoc and Ecto will automatically figure out what to do.
defp parse_tags(json) do
  {:ok, tagnames} = Jason.decode(json)
    tagnames |> Enum.map(&get_or_insert_tag/1)
end
Either a tag provided in the JSON input exists in the database or it doesn't and we have to create it.
defp get_or_insert_tag(title) do
  Movo.Repo.get_by(MyApp.Tag, title: title)
  || Movo.Repo.insert!(%MyApp.Tag{title: title})
end
That was Tag management 101. Ecto will take care of building and breaking connections as well as creating new tags if required!
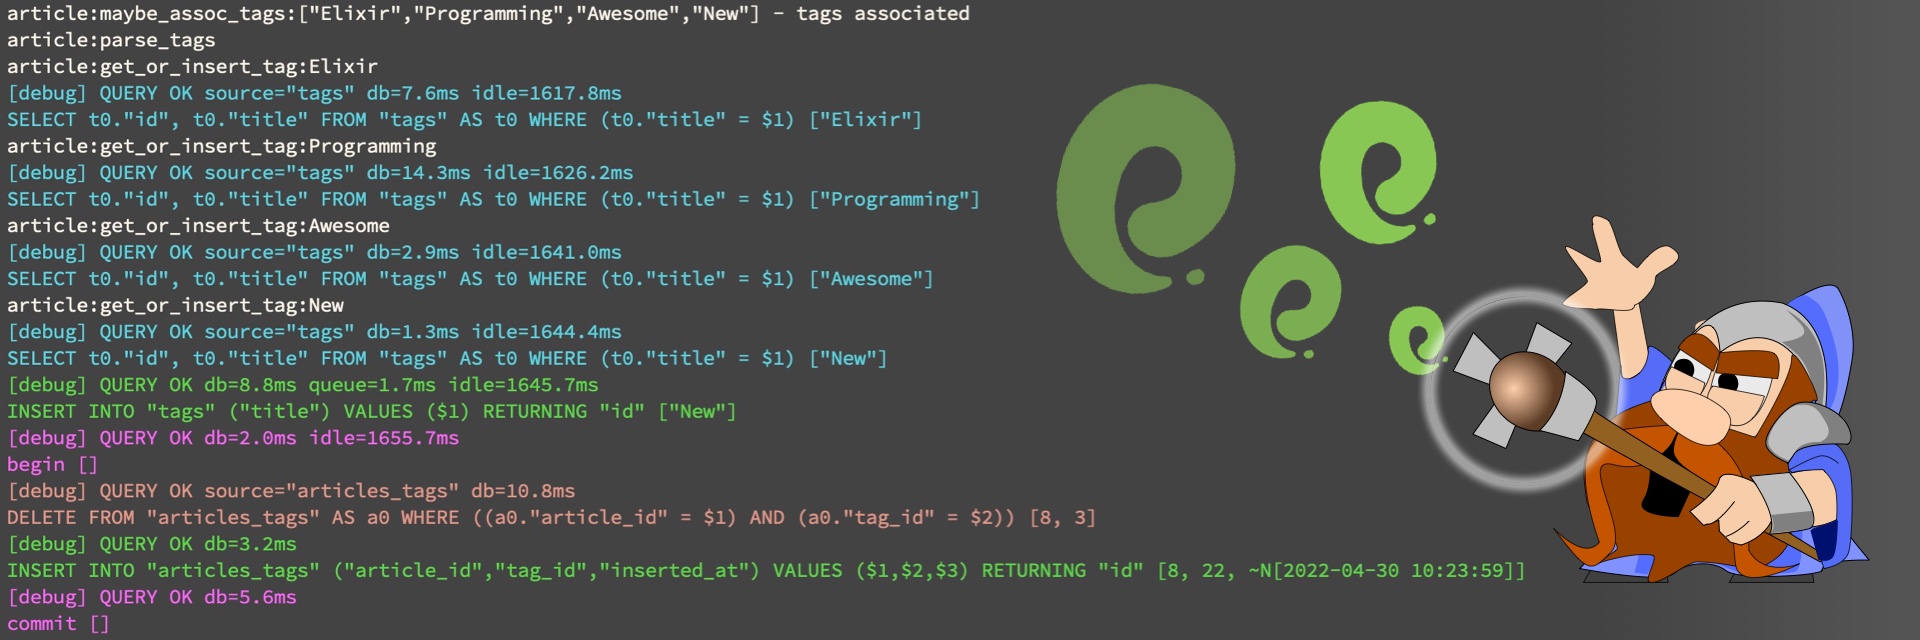
Bonus: the changes are handled in one SQL transaction, as visible in the log illustrated below
Tag Association Magic
By way of illustration, imagine an Article associated with 3 Tags: A, B and C.
Let's assume the result of changing tags on the User Interface returns the following tag_json:
tag_json: ["A", "C", "D"]After updating the changeset in the database Ecto will resolve the differences by eliminating the relationship with tag B and creating a new one with tag D. The rest will remain unchanged.
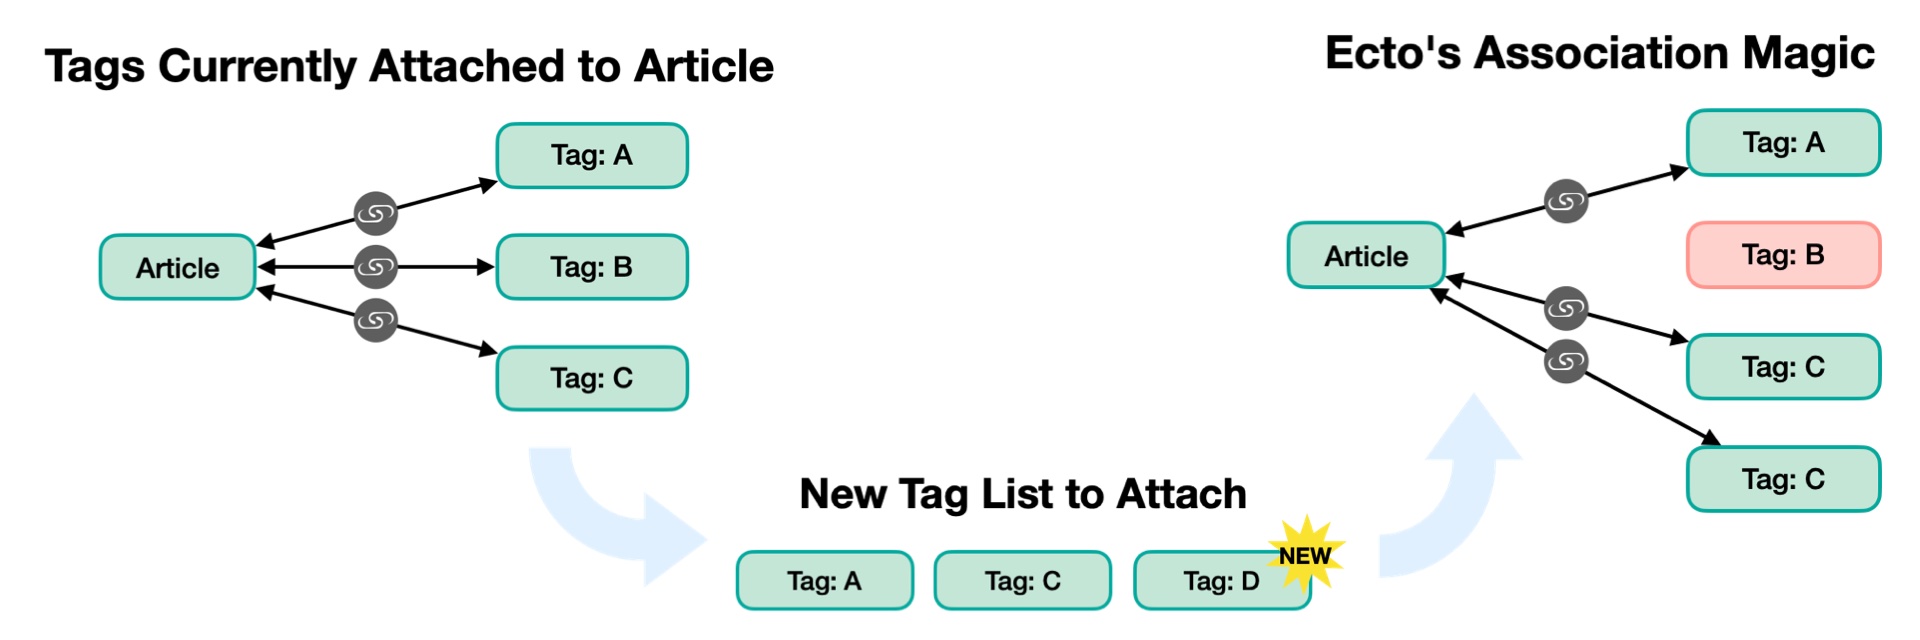
If the Tag D doesn't exist in the database, it is created by get_or_insert_tag (defined above).
Tag Input Widget
Now that we have a working backend, let's concentrate on the User Interface (UI): a widget allowing us to input tags. As mentioned earlier, it's basically a text input widget.
The trick is to trigger an event on key-up and send the value of the text field to the LiveComponent backend. The new tag sent will be validated and added to the existing tags and the UI will be refreshed.
defmodule MyApp.Helpers.TagInput do
  use Phoenix.LiveComponent
  use Phoenix.HTML

  def render(assigns) do
    ~H"""
    <div id={"tag-input-#{@myself.cid}"}>
      <input name="tag-#{@myself.cid}" type="text"
        placeholder="start typing..."
        phx-target={@myself} phx-keyup="key-up"
			/>
      <div class="tag-list">
      <%= for tag <- @tags do %>
        <%= content_tag(:span, "#{tag}" %>
      <% end %>
      </div>
    </div>
    """
  end
end
Pretty simple, isn't it? Let's take it a step further and make this component a stateful one. We need to define update and handle event functions:
def update(assigns, socket) do
  tags = get_csv(assigns.changeset
  	|> Ecto.Changeset.get_field(:tags_csv))
  {:ok, socket
    |> assign(assigns)
    |> assign(tag: nil)
    |> assign_tags(tags)
  }
end

defp assign_tags(socket, tags), do: socket
  |> assign(tags: tags)
	|> assign(tag_json: Jason.encode!(tags))
Three assigns are defined:
:tagwill contain the input tag, empty initially:tagswill hold the list of all tag names associated with the current article, plus the ones added but not yet persisted in the database:tag_jsonwill save a version of the tags that can be stored in a hidden input
The key-up event handler
# if I press `Enter`
def handle_event("key-up", %{"key" => "Enter", "value" => tag}, socket),
do: {:noreply,
	socket |> assign_tags(socket.assigns.tags ++ [tag])}

# otherwise
def handle_event("key-up", _, socket),
do: {:noreply, socket}
It all seems peachy until we try it out. Here's the issue. Pressing Enter on the text input submits the form... but that's not what we want.
Some voodoo is required to handle this. Let's have another look at the tortured text input and cancel any Enter key event not defined by Phoenix.
<input ...
	onkeydown="return event.key != 'Enter';" />
A second bit of black magic is required to clear the text input once Enter is sent via phx-keyup event. Presently, it is not possible to simply reset the value of the input through the use of assigns. One can only hope this will change in the future versions of Phoenix.
<%# SADLY DOESN'T WORK %>
<input ...
	value={@tag} />
When nothing else works, one can always rely on JS. Phoenix provides an elegant way to add JS interaction through the use of Phoenix Hooks. In your app.js add
let hooks = {}
hooks.FieldReset = {
  updated() {
    if (this.el.dataset.tag == "") {
      this.el.value = "";
    }
  }
}
let liveSocket = new LiveSocket("/live", Socket,
  {hooks: hooks, params: {_csrf_token: csrfToken}})
And to the text input add
<%# VOODOO AT WORK %>
<input ...
	phx-hook="FieldReset" data-tag={@tag} />
Now, every time the component is updated, the hook will try to clear the text field.
Deleting tags
Deleting tags is terribly simple. I wasn't sure that I would even if I was going to broach the subject.
Let's get back to the render function and modify the tag list by adding a new event trigger.
<%= for tag <- @tags do %>
	<%= content_tag(:span, "#{tag} (x)",
		phx_target: @myself,
		phx_click: "tag-delete",
		phx_value_tag: tag) %>
<% end %>
All that is left to do is to add a handler in the TagInput component for the tag-delete event.
def handle_event("tag-delete", %{"tag" => tag} = params, socket),
do: {:noreply, socket |> assign_tags(socket.assigns.tags -- [tag])}
Now, how difficult was that? 😉